i have installed about 4 signatures in the last 24 hours.
i am no stranger to them,
however, i am new to the wordpress world.
and now that i am learning and designing in the wordpress interface, i’ve had to learn to do some things on my own. things that no matter how long i searched for the answer, i just couldn’t find it.
so i’m just going to tell you
how to install a signature on your blog,
whether you are a blogger, or a wordpress-er.
{cause i believe in equality and all that…}
a signature:
to make one, you can use any program that you can edit your file in layers. if you don’t have photoshop or illustrator, you can use picmonkey.
be sure to save it as a .png file with a transparent background so you wont have a nasty box around it. that’s tacky. don’t do it.
upload it your photobucket account…
what, you don’t have one???? go take two seconds and do that… i’ll wait.
k, back?
for blogger:
head to your html code,
Dashboard>Template>HTML
Click on Expand widgets, then search using Crt F the following code:
<data:post.body/>
and paste the following code underneath it:
<center><img src='IMAGE URL' style='border: none; background: transparent;' /></center><br/>
replace the “image url” with your image you uploaded to photobucket.
{it’s the direct link}
preview it on your blog before you save it and you will see where it showed up.
you can also try pasting your new code under this code:
post-footer-line post-footer-line-1
<div class='post-footer-line post-footer-line-1'>
but be sure to preview before you save…
then save it and you’re done!
if you still have issues with a border around your image…
{i’ve noticed this happens in blogger}
thus making your signature look tacky, like you uploaded it every time…
sometimes even after changing the photo settings…

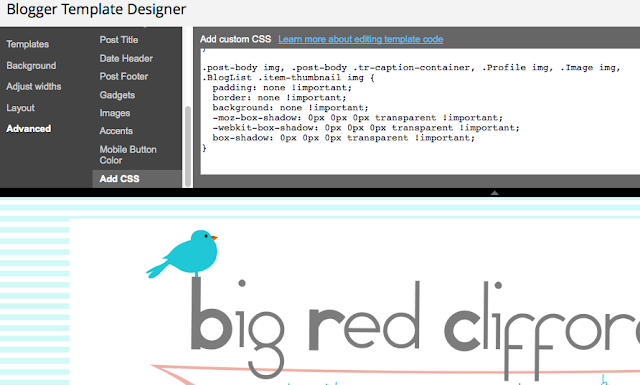
go into your css style sheet…
{dashboard>template>customize>advanced>add css}
and paste the following code:
.post-body img, .post-body .tr-caption-container, .Profile img, .Image img,
.BlogList .item-thumbnail img {
padding: none !important;
border: none !important;
background: none !important;
-moz-box-shadow: 0px 0px 0px transparent !important;
-webkit-box-shadow: 0px 0px 0px transparent !important;
box-shadow: 0px 0px 0px transparent !important;
}

now, if you are a wordpress user,
{i believe you will only have access to the code like this if you are self-hosting your blog on a .com site rather than on your free wordpress.com account}
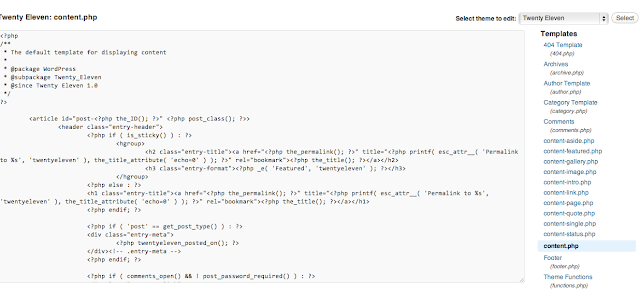
find the template for “content.php”
{dashboard>appearance>editor}
search for the following code:
<footer class=”entry-meta”>
just ABOVE this code, place the following code:
<center><img src=”YOUR-PHOTO-URL-HERE”/></center>
</br>

i’m not sure you can preview this one, so i just copy/paste the contents of the html page i’m editing into a word doc until i’m done. that way if i screw up the place, i can go back and repaste it to it’s original state.
if you have questions, leave a comment, and i will do my best to help!


You lost me at code. :p
Meg! Thanks for the tips and for stopping by my blog. I'm a new follower! 🙂
Thanks this is a great help.
So nice to have you!!
Great! I'm glad it worked!
I have been wanting to do this! Thanks for sharing:)
Thank you so much for linking up at Tuesday Time Out! Your tip is our featured Tip Of The Week on the sidebar!<br /><br />Melanie 🙂
You are like the 20th tutorial I looked at… and it FINALLY worked and centered it!!<br /><br />Thank you so much!! You are a life saver for my OCD that wanted a centered signature lol.
Brilliant! Thank you! I have been copying and pasting my signature into every post for a year now! Thank you!
I need so much help getting my blog to look pretty, I will, more than likely, use every tip you've got including this one! Thank you for being on pinterest where I could find you.
Working out how to do this was my task for the weekend, you've just saved me so much time, thanks! 🙂
Me too! I actually felt my heart speed up & I felt a little sick :/ Even the appearance of HTML is terrifying to anyone unfamiliar with it, everyone is a beginner at some point, who knows maybe I’ll “get” HTML someday 🙂 Thank you for your post, though. I use an image as my signature at the end of my posts. Sending hugs x
This is a great tutorial! One question: what size should I make my signature? When I’m setting up the pic in pic monkey, it allows for custom sizes, and I’m not sure what would be appropriate…. Thanks!
It depends on your image, but I would go with less than 250 wide. I think I usually ended up about 150.
thank you for this!
I’ve studied this blog post for quite some time and I would love a signature at the end of each of my posts. Although, my HTML doesn’t seem to have any of the codes you mentioned? Is there and alternative route of adding the signature?:/
2 things: 1, the code doesn’t have to be exact. If you copy/paste a portion of the code you might find something very similar and it will do the same. 2, The issue is that the platforms often change the way they present the html code. I used to design on blogger and it was very simple to change the code and customize using CSS code, but they’ve since changed some things so the code, when entered, no longer makes changes as it should. WordPress is often easier because there is a plugin for almost everything. I haven’t tried it in my template now, but I would check there first. If you can’t find it there or by googling a RECENT code to enter, I would find a coder to add it for you real quick. I recommend a site like Fiverr to hire someone for $5 or $10 to just drop one in real quick if you need it done without a headache! I don’t design anymore because it turns my hair gray!! 😉 Good luck. Sorry for the outdated post!